Showing posts with label #6costumes2months. Show all posts

Monday, October 29, 2018

The Sewing place...

 Here's a quick look at the place where the creating happened this summer. We're still working on the interior, so things steadily change, but it's fun to see the progress!!
The South windows let in a lot of light, a lot of heat, but we got the porch on this summer! (After pic)

Short Cape, fur-collar out, hangs on my 'self made manikin".
  At this point we are still "en media res" with the construction, even though that has really slowed down to a crawl.
(As in, outdoors work has taken precidence over indoors finishing!)

     We've got most of our stuff moved over, but it's far from organized at the new place. My lovely spinning wheels are sitting largely unused, and our closet (in the background) still holds so much electrical and lighting supply that it's not functioning for the wardrobe very well!

 But! I've used a free standing drying rack to drape my project fabrics on, working against the "out of sight, out of mind" principle.

   They are really pretty, and I do find myself impatient to begin getting them worked up into their intended garments!


 The west facing window lets in a lot of good light, but gets a bit hot in the afternoon so the curtains are a must! But it's lovely to have an entire table to work on, and not have to share with meal times!

   Stacking the lightweight shelves on top of our old childhood dresser gives us so much vertical space, we haven't utilized it all!

  But you can see the really beautiful faux fur roll at the top, which trimmed the Short Cape, and the Old German gown.


Tuesday, July 17, 2018

Fare Thee Well, Wherever You Fare! :-)

Well, it has come. 
   Tomorrow is departure day, and I'm... not ready. But if there's one thing I've learned, it's that life never waits for me to be ready! 
   So we jump anyway.

#6costumes2months was great distraction from the jitters, and I did have 6 costumes... but one was axed because it wasn't coming together properly, and Abi-sis & Mom were adamant about "quality, not quantity!!!" 

    Then Abi and I hashed out how many days, and what to wear when, and she strongly presented that packing more then 4 costumes would be unnecessary and un-mindful of my fellow travelers... so it's only the best 4 that will be coming.
   Hope to give those a full, expansive showing over this coming week!!! 

   So, in spite of a super busy summer, crazy hectic week, lots of mid-progress going on here at the farm... I've wrapped things up as well as I can wrap them, and will set forth to do battle with new adventures, in the company of friends! 

Until we meet again... think of me! 

Thursday, July 12, 2018

So!!! Crunch time! With less than a full week to go til departure day, I've got a lot of sewing still to do! The costume line up is still a bit in flux, and as some of the staple outfits near completion the remaining time does affect decisions made on the less 'must have' ensembles.
   I think we've gone back and forth on several of these multiple times! That's a problem with having more fun ideas than you have days to wear them on at Realm Makers.

 However, one of the 'more simple' designs was definitely voted yes on, was a Belle outfit. I completed the bodice for it the other day
  I've worn it around a few times, to let it "wear in" to smoother shape... there may be a few tweaks needed still but it's good enough to be considered Done.

  Here's a shot of the side of the bodice.

So, all that remains is the skirt, since I whipped up the apron this afternoon. (No pic of that yet, sorry!), and got this pic. 
 In other news, Abi found her pieced quilt top, unearthed from some box where it had lain hidden for 2 years, since the move. She was pretty excited to see it again, so we hung it up in the window on top of the curtain, and the light shining through gives it a stained glass effect.


Monday, July 2, 2018

Faux Burgandian, now Old German, gown; update!

We've been hard at work on making progress... even though we've been blessed with some great visits from friends, which of course are always more than welcome! 😊

 That being said, I thought I'd just nab a short clip of what we've got so far.


 So there you have it!
    The addition of the faux-fur trim is really the thing that brings it to life.

   #6costumes2months

Monday, June 4, 2018

Progress report: Silk is Slow Sewing. :-)


 We are hard at work on the Faux-Burgundian, though it begins to look like it'll be more of an "old German" gown... and it's slower going working with the slippier fabric.

  I have finished off the chemise for underneath it, which I used as a "muslin" and made the pattern-test first on that! It's turned out really nice, and lead the way so nicely... but the change in fabric has necessitated a few differences in getting this over-gown done.

  This is the basic shape laid out as we were sewing it together...
(Tip: paper under your pressure foot is a must! And a layer on top is even better, so keep the stuff from slipping into a wrinkly seam. We learn as we go! )

Many late nights have been involved, you can bet on that!!!


The "hand" is really gorgeous on this fabric, though. My very first foray into sewing with actual silk. (From Dharma Trading.)

   I've found that sometimes it's faster to just hand-stitch something rather than fight the slippery through the machine. So I'm developing a technique for when to sandwich with paper and when to iron in place and stitch by hand!


In all, I'm really loving the look of the over-gown, and I think this is really going to come together nicely. But it is taking longer than I'd hoped... but new things often do!!!

  On the up side, we've figured out ways to re-use the piece multiple times, and will be having the sleeves as an "add one" piece instead of firmly attached. This will allow us to go with a lot of different looks while using this one main gown, and should help in the long run with our completion schedule!!
  #6costumes2months And we're already into our second month now!!!


So, as a wrap up on the previous post, with the embroidery question, the horse definitely won out on the votes!
   So we will be going with a horse on the other sleeve, (though I may change the look of that horse) And Perhaps, to keep the pattern from looking imbalanced, we should add a little more detail in other areas, so there's not this open scroll-work, and then pop, tight detail only in the middle.
        I'll be thinking about that!

Many thanks for helping out by sharing your opinions, everyone! It really took a load off my already frazzled mind!


Thursday, May 24, 2018

Foundation Layers: catch-up update. Chemise #3


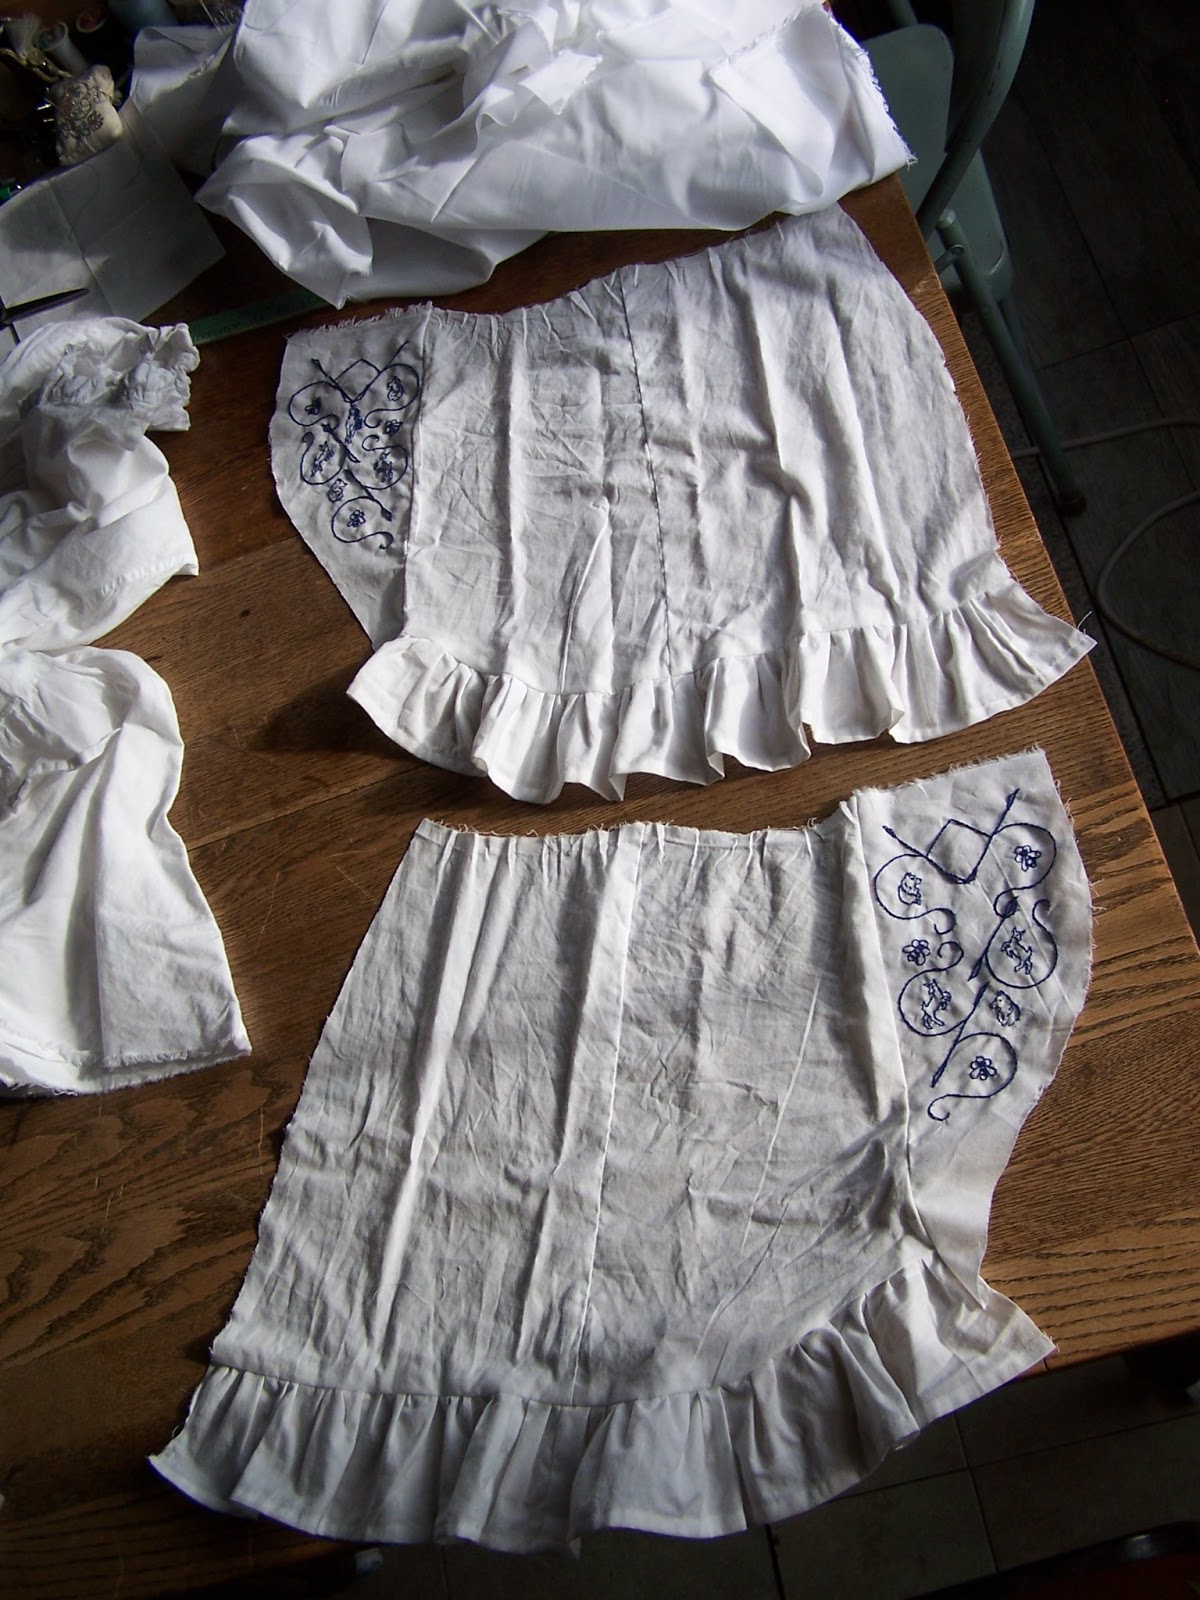
So, with the cutting off of the excess sleeve from Chemise #1, I couldn't bear to let that ruffled edge be tossed. So I resolved to re-utilize them, and the thing that came to mind was to embroider on the odd, angle-y piece and make it look like an intentional insert.I think this will be super cute for the Shepherdess outfit, so I'll have to do some pondering there. The 18th c. was renowned for having very wide, exposing necklines... which I'm not interested in doing, so what to use instead, which will look "correct" with the rest of the outfit is a question.


 I cut a body somewhat similar to the original Chemise #1, but with a bit more roominess. Then I will attach the sleeves once I am certain their embroidery is done, and afterward I'll figure out what to do with the neck-line/collar area.

 If I end up with any sort of collar, etc, I may do some embroidery on that as well... but it's not decided yet.


I like the look of Elizabethan era "black work", or sometimes when done in red it's called "red work". But I don't like black or red all that well, so I resolved to make some "blue work". ;-) I drafted up the pattern by stages, applying the steps one at a time as I decided on them.

Of the two general styles of black-work, most is rather 'cross-hatch-y' and geometric, but there are examples that are more "scroll work-ish". I like that better, so went with that for my main pattern.
 Then I drew up the bees on honeycomb, the Belgian Tervuren heads, and the dancing kid goats, and put them in as I finished with their concepts.

I plopped the horse in the middle at the end, but now I'm reconsidering. Does it make the look "too busy"? I don't like how the horse turned out, and would be okay with tearing it back out if that was the best decision.
  On the one hand it would save having to make a matching one for the other sleeve, and slot that time toward something else!


   But I'm not sure the "un-horsed" sleeve looks quite "finished" yet, so I guess I can't decide whether the pattern needs more activity or to leave it alone at this stage.


Vote now! Which do you think?
  Left... or Right is better?
  I need to poll the audience!!!

Saturday, May 19, 2018

#6costumes2months Short Cape

 I didn't feel brave enough to go with a full length cloak, but looking on Pinterest sparked the desire to have a mid-length cape to use.

   The Tudor-era style of wearing a short cape slung over only one shoulder always looks so dashing to me, so I hoped to create one that could go either way.

  I used a short plush polly, of a sort of "polar fleece" variety, but with enough nap to look like one of the velvet family.
  It's got some major stretch in it, which was not what I was aiming for, but so far I've not had any ill effects.
 
    I am a huge fan of making things reversible, and if we were going to trim this with the faux fur I wanted that to look nice on both sides. That proved to be a trick, something that I'm still not sure I have a great answer to.

Basically I just ended up wrestling with it until it succumbed to my will.

 But the collar is full fur on the underside, so if reversed it has a different look. (I like doing that!)
  It is possible that the front edges could use something to stabilize them, rescue from a tenancy to 'sag' courtesy of all that stretch I mentioned earlier.
  At this point the jury is out, so we'll wait and see. I can always add a heavy trim later (which would look fancy as well as add solidity.)

   Or I could run the faux fur up there as well, and hopefully I'd have a smoother time of it this time around, having busted through that wall once already.

 Although we took a photoshoot of it the instant it was "done"... (a la these pics) It still isn't really done.
 The lower trim isn't finished off at the front edge, because I'm still not decided on whether to run that up the front or not... and it needs a clasp or several to be fully functional.

 (I used straight pins to attach it to my bodice straps for this shoot. A practice I do not intend to make a habit of... those stab!)

Thursday, May 17, 2018

Foundation Layers: catch-up update. Chemise #2


  In the pursuit of chemise perfection, my second attempt was a "Squares" or actually Rectangles... which I call my "Viking style" (as per Pinterest. But I can't find my references at the moment!!)

The idea with this was to have a rectangles for the upper/shoulder area, and the sleeves, and then the lower part is fuller and gather on to the upper part rectangle.

   A pair of triangles go in the bottom of the sleeves, as gussets. This renders the sleeve attachment nice and roomy enough for ease of movement, in spite of a rather small overall armscye.

That worked out great, except that I miscalculated the needed shoulder width, so I had to have add smaller rectangles on the side, then the sleeves onto that.

 Also, I wasn't sure how to finish off the collar area, so it's still just an open seam at the top, with a slit down the front to make it wide enough for a head to go through.


 I like to wear my new garments a bit to make sure they feel all right... and this one has already made it into two photoshoots.


 One was for author friend Caitie (C. R.) Hedgcock visiting from England last month... we put a hastily concocted cravat on it to cover the unfinished collar, and used it under the boned "ladies waistcoat" we custom made for her while she was here.
 

 Caitie's look has the sleeve ends tucked in for a more polished appearance, whereas when Abi-sis and I did a shoot for my short cape (think Tudor style!) I opted to leave the ends open.
   In retrospect it seems that for me, the sleeve rectangles might have also been cut too short for my arms... so next time I might consider making all the upper rectangles longer.
    But it still works!

Wednesday, May 16, 2018

Foundation Layers: catch-up update. Chemise #1

So, I've been sort of holding the idea in my head for some time, of the "Just Do IT" nature concerning my "dream costumes"... and with RM being in St. Louis, etc. this past winter I started tentative steps forward. 

  Chemises are the base layer, and made of muslin which is a fairly "non-panicky fabric" for me, so I started there.

  Chemise #1:

 I tried a bit of contour in the body, with a simple ruffle neck line in a sort of scoop (which turned out to be a bit too open, for my proportions, so I'll have to see if this actually gets used for Realmies.)

 I've always loved super fluffy sleeves, (on other people, I've never been brave enough to try them myself) so I went with a really "angel wing" fullness in a sort of three quarter length.

   This turned out to be way too much poof for my figure, and I realized that for my first try I've overshot the mark.

  I undid the sleeve at the shoulder, cut the fullness down by about half, and re-sewed to the body. This resulted in the final sleeve, at right.

 
 I also found that the contour I had cut the body at was too tight at the waist for the rest of me to fit through (although it looked very nicely fitted once I got in, but only if I had help to struggle into it!)

   This was not acceptable... I needed more room to get in, as well as simply more room up top. So I sliced it up the front and added a panel for extra width. I did not want extra room in the neckline, so I pleated aggressively where it joined the neckline.

   This loosened it up all over quite a bit, but chemises are usually loose so that's par for the course.

 I had a vague idea of using this as a chemise for a Belle outfit, so as an added touch I stitched a heart, white on white, on top of the pleating. (You can barely see it, but it's the little details that make garments fun.)


  The sleeve pieces that remained were way too use-able to just discard...  (all that ruffling was still on them! That was hard work!)
   So, I put them aside to become sleeves in their own right on what turned out to be Chemise #3.

Tuesday, May 15, 2018

#6costumes2months, Starting Post!

As I had hoped, prompting from a friend (thanks, Camilla!) has re-ignited my focus on this project! (So keep those pokes and prods coming, dear Reminders, whenever you feel I haven't reported in a while!)


   To start it off, I want to quickly outline some of the ideas that are on the board... these are not fully formed, and I reserve the right to swap out at any time for something else that strikes my fancy more, or looks easier. ;-)

  There must be a Tardis dress, some where, in some fashion. (Because I splurged on the fabric for it years ago, and have never gotten up my courage to actually cut into them!!!)

 There will be a Belle. (Because that look is simple, and fits right in with my go to color scheme anyway. I'm a blue-&-white sort of complexion!)

 And there will be what I'm calling a "faux-Burdundian" or what may turn out looking like an "old German" gown... fake-fur trim and all!  (Sketches on the right, above.)

https://www.pinterest.com/pin/71002131610006410/

https://www.pinterest.com/pin/71002131610233886/

https://www.pinterest.com/pin/71002131597939617/

https://www.pinterest.com/pin/71002131609385249/

 There is also planned to be a "Blue China Shepherdess", or "Little Bo-Peep" or  "18th Century Shepherdess", with side puff skirts over side hoops. (Because we have the perfect print for that, and the side hoops are addictingly fun!!!)

  I also wanted to do a "fem!Beast" or a "fem!Gaston" ... because I have a fawn skirt that reminds me of that era of breeches. So it seemed like low hanging fruit that oughtn't to be passed up. But we may end up just accessorizing it to be "fem!Huntsman" instead.  (Short Cape has been made, almost completed!)

  These I either have the fabric for, and need the impetus to cut into it; or I have parts already in my closet; or I've made pieces already, so that's a guarantee to use them.
   The remaining number of outfits are not nailed down yet, and I work best when there's built-in room to change my mind if something comes up.

  So... that's the line-up so far... and now I'll introduce the pieces that are already created. (Or started.)